
마로의 개발일지
local 환경에서 server -> smart contract 호출 해보기 본문
서버에서 스마트 컨트렉트 호출하는 부분을 구현해 보았다.
local 환경 구성 정보는 다음과 같다.
- ganache(7.9.0)
- remix ide(0.8.18+)
- node.js(18.17.1)
- ethers.js(6.7.1)
Ganache
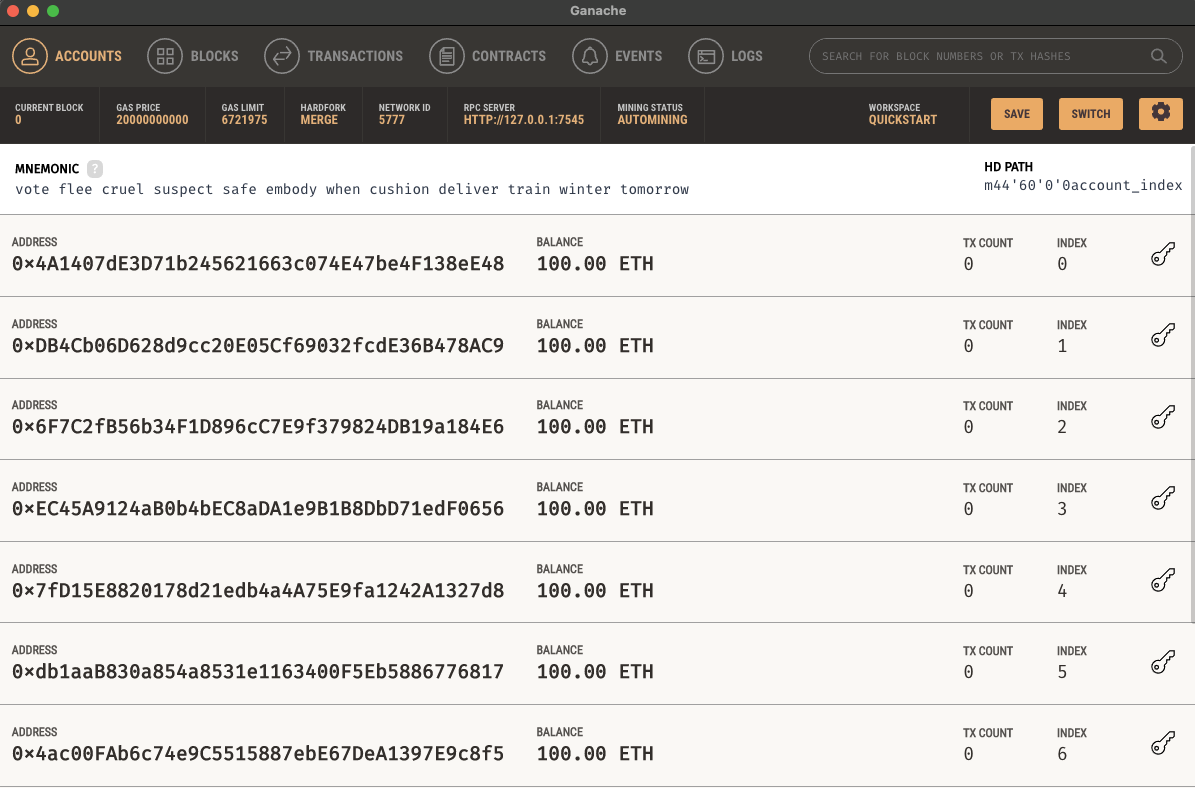
먼저 ganache 클라이언트를 실행시켜 블록체인을 생성 및 실행한다. 상단의 RPC SERVER 주소를 이후에 사용하게 되며 원한다면 설정에서 수정할 수 있다.
Remix IDE
이후 remix ide에서 간단한 스마트 컨트렉트 파일을 작성한다.
// SPDX-License-Identifier: GPL-3.0
pragma solidity >=0.8.0 <0.9.0;
contract Function {
uint8 private data = 255;
function setData(uint8 _data) public {
data = _data;
}
function getData() public view returns(uint8) {
return data;
}
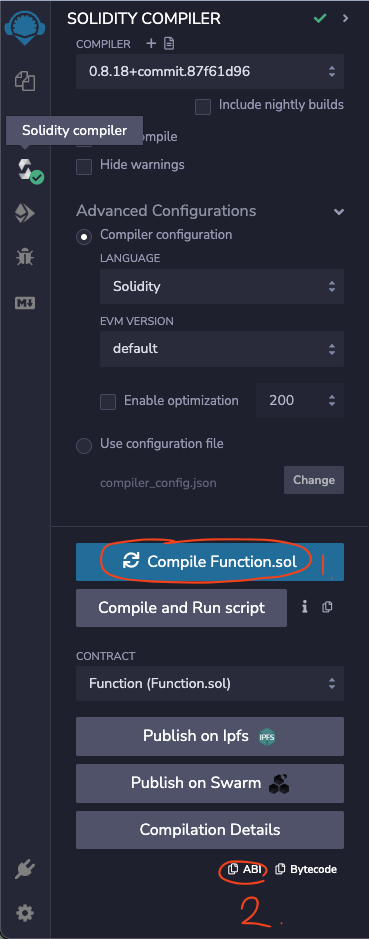
}작성했다면 왼쪽의 Solidity compiler 탭에서 Compile Function.sol을 클릭하고 아래의 ABI 복사 버튼을 클릭해 ABI를 복사한 후 별도로 저장해 둔다.
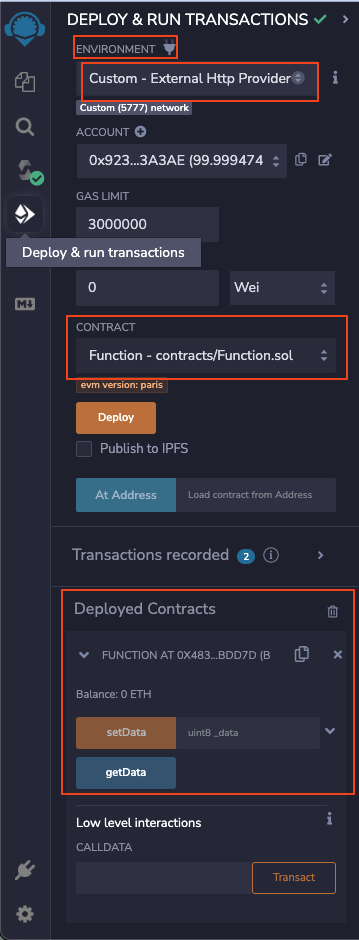
이후에 Deploy & run trasactions 탭을 클릭하여 ENVIRONMENT를 Custom으로 설정해 준다. 설정을 누르면 External Http Provider Server를 입력하는 창이 나오는데 해당 부분에 ganache의 RPC SERVER 주소를 입력해 준다. 이번 예시에서는 http://127.0.0.1:7545를 사용하기 때문에 기존의 8545 포트를 7545로 수정해 준다.
환경을 설정한 이후 배포할 컨트렉트가 잘 선택되었는지 확인하고 주황색 Deploy 버튼을 클릭한다. 배포 이후 Deployed Contracts에 배포된 컨트렉트 항목들이 나타나며 해당 컨트렉트의 주소를 복사해 둔다.
Node.js Server
node.js 와 ethers.js는 설치가 되어 있다고 가정하고 진행한다. 먼저 RPC 통신을 제공하는 Node인 provider 객체를 생성한다. 우린 자체 블록체인을 ganache를 통해 생성했기 때문에 ganache의 RPC SERVER 주소를 입력하여 provider를 생성한다. 이후 provider를 통해 signer를 생성한다. signer는 provider가 transaction이나 컨트렉트 호출을 할 때 사용하는 객체로 서명을 대신 처리해 주는 역할을 한다(signer 대신 wallet을 직접 생성해 입력할 수도 있다). 다음으로 따로 저장해 뒀단 컨트렉트 주소와 ABI를 변수로 저장한 뒤 생성한 객체와 저장한 변수들을 이용해 실행할 Contract 객체를 생성한다.
// provider 생성
const provider = new ethers.JsonRpcProvider('http://127.0.0.1:7545');
// signer 생성
const signer = await provider.getSigner();
// wallet 생성
const wallet = new ethers.Wallet(
      PRIVATE_KEY,
      provider,
    );
// 컨트렉트 주소 저장
const contractAddress = '0x7E34Ad619BBeB784801532a2bA81FEb6DCEBD542';
// abi
const abi = [
  {
    inputs: [],
    name: 'getData',
    outputs: [
      {
        internalType: 'uint8',
        name: '',
        type: 'uint8',
      },
    ],
    stateMutability: 'view',
    type: 'function',
  },
  {
    inputs: [
      {
        internalType: 'uint8',
        name: '_data',
        type: 'uint8',
      },
    ],
    name: 'setData',
    outputs: [],
    stateMutability: 'nonpayable',
    type: 'function',
  },
];

// 컨트렉트 생성
const contract = new ethers.Contract(contractAddress, abi, signer);
// signer 대신 wallet으로 생성
// const contract = new ethers.Contract(contractAddress, abi, wallet);
생성한 컨트렉트 객체를 이용하여 원하는 메서드를 호출한다. 참고로 자동완성이 되지 않더라도 실행하고자 하는 메서드 이름과 변수를 입력한다면 실행된다.
await contract.getData().then((res) => console.log(res));
await contract.setData(10).then((res) => console.log(res));
await contract.getData().then((res) => console.log(res));
Nest.js의 서버를 띄워서 테스트 했기에 전체 코드는 다음과 같다.
import { Controller, Get } from '@nestjs/common';
import { AppService } from './app.service';
import { ethers } from 'ethers';

@Controller()
export class AppController {
  constructor(private readonly appService: AppService) {}

  @Get()
  async getHello() {
    // provider 생성
    const provider = new ethers.JsonRpcProvider('http://127.0.0.1:7545');
    // signer 생성
    const signer = await provider.getSigner();
    // 컨트렉트 주소 저장
    const contractAddress = '0x7E34Ad619BBeB784801532a2bA81FEb6DCEBD542';
    // abi
    const abi = [
      {
        inputs: [],
        name: 'getData',
        outputs: [
          {
            internalType: 'uint8',
            name: '',
            type: 'uint8',
          },
        ],
        stateMutability: 'view',
        type: 'function',
      },
      {
        inputs: [
          {
            internalType: 'uint8',
            name: '_data',
            type: 'uint8',
          },
        ],
        name: 'setData',
        outputs: [],
        stateMutability: 'nonpayable',
        type: 'function',
      },
    ];
    // 컨트렉트 생성
    const contract = new ethers.Contract(contractAddress, abi, signer);
    // 컨트렉트 실행 부분
    console.log('---------------START-----------');
    await contract.getData().then((res) => console.log(res));
    await contract.setData(10).then((res) => console.log(res));
    await contract.getData().then((res) => console.log(res));
    console.log('--------------END--------------');
    return 'Hello';
  }
}
후기
이번 실습을 통해 좀 더 서버와 컨트렉트가 상호작용하는 것에 대해 좀 더 잘 이해할 수 있게 되었고, 블록체인의 동작 원리와 서명에 대해 좀 더 공부가 필요하다고 느꼈다. provider라는 개념이 처음에는 이해가 가지 않아서 어려웠는데 생각해 보니 JSON PRC 통신을 하려면 PRC 호출을 받아주는 Node가 있어야 했다. 원리를 좀 더 잘 이해하고 있었다면 좀 더 빠르게 이해할 수 있었을 것이다.
잘하시는 분들이 본다면 정말 간단하고 단순한 코드겠지만 아무것도 모르는 나에겐 꽤 시간이 걸렸다. 나 같은 사람들에게 도움이 되면 좋겠다.
'알게된 것' 카테고리의 다른 글
| NestJs JwtAuthGuard @Pulic과 함께 사용하기 (0) | 2023.11.11 |
|---|---|
| Spring-data-MongoDB upsert시 duplicateKeyException 해결하기 (0) | 2023.05.21 |
| AWS AppConfig 배포시 Lambda 호출 설정하기 (0) | 2023.04.22 |
| Java에서 Aws AppConfig 사용하기 (0) | 2023.04.15 |
